Vue 3's template syntax is the foundation of building reactive user interfaces. Whether you're just starting with Vue or looking to solidify your understanding, this guide breaks down the essential template features with practical, easy-to-follow examples. Let's dive in!
1. Interpolation: Displaying Dynamic Data
Interpolation is the simplest way to display data in your Vue templates. Using the double curly braces syntax {{ }}, you can render reactive data directly in your HTML.
<template>
  <div>
    <h1>{{ message }}</h1>
    <p>{{ count * 2 }}</p>
    <p>{{ user.name.toUpperCase() }}</p>
  </div>
</template>

<script setup>
import { ref } from 'vue'

const message = ref('Hello Vue 3!')
const count = ref(5)
const user = ref({ name: 'Alice' })
</script>
Key Points:
- Displays reactive data that updates automatically when values change
- Supports JavaScript expressions (calculations, method calls, ternary operators)
- Cannot use statements (if, for, etc.) inside interpolation
2. v-bind: Dynamic Attribute Binding
The v-bind directive binds data to HTML attributes. The shorthand : is commonly used and preferred for cleaner code.
<template>
  <div>
    <!-- Long form -->
    <img v-bind:src="imageUrl" v-bind:alt="imageAlt">

    <!-- Shorthand (preferred) -->
    <img :src="imageUrl" :alt="imageAlt">

    <!-- Dynamic classes -->
    <div :class="{ active: isActive, 'text-bold': isBold }">Styled div</div>

    <!-- Dynamic styles -->
    <p :style="{ color: textColor, fontSize: fontSize + 'px' }">Colored text</p>

    <!-- Binding multiple attributes -->
    <button :disabled="isDisabled" :id="buttonId">Click me</button>
  </div>
</template>

<script setup>
import { ref } from 'vue'

const imageUrl = ref('https://example.com/image.jpg')
const imageAlt = ref('Example image')
const isActive = ref(true)
const isBold = ref(false)
const textColor = ref('blue')
const fontSize = ref(16)
const isDisabled = ref(false)
const buttonId = ref('submit-btn')
</script>
Common Use Cases:
- Classes: Conditionally apply CSS classes based on component state
- Styles: Dynamically set inline styles with JavaScript objects
- Attributes: Bind any HTML attribute (src, href, disabled, etc.)
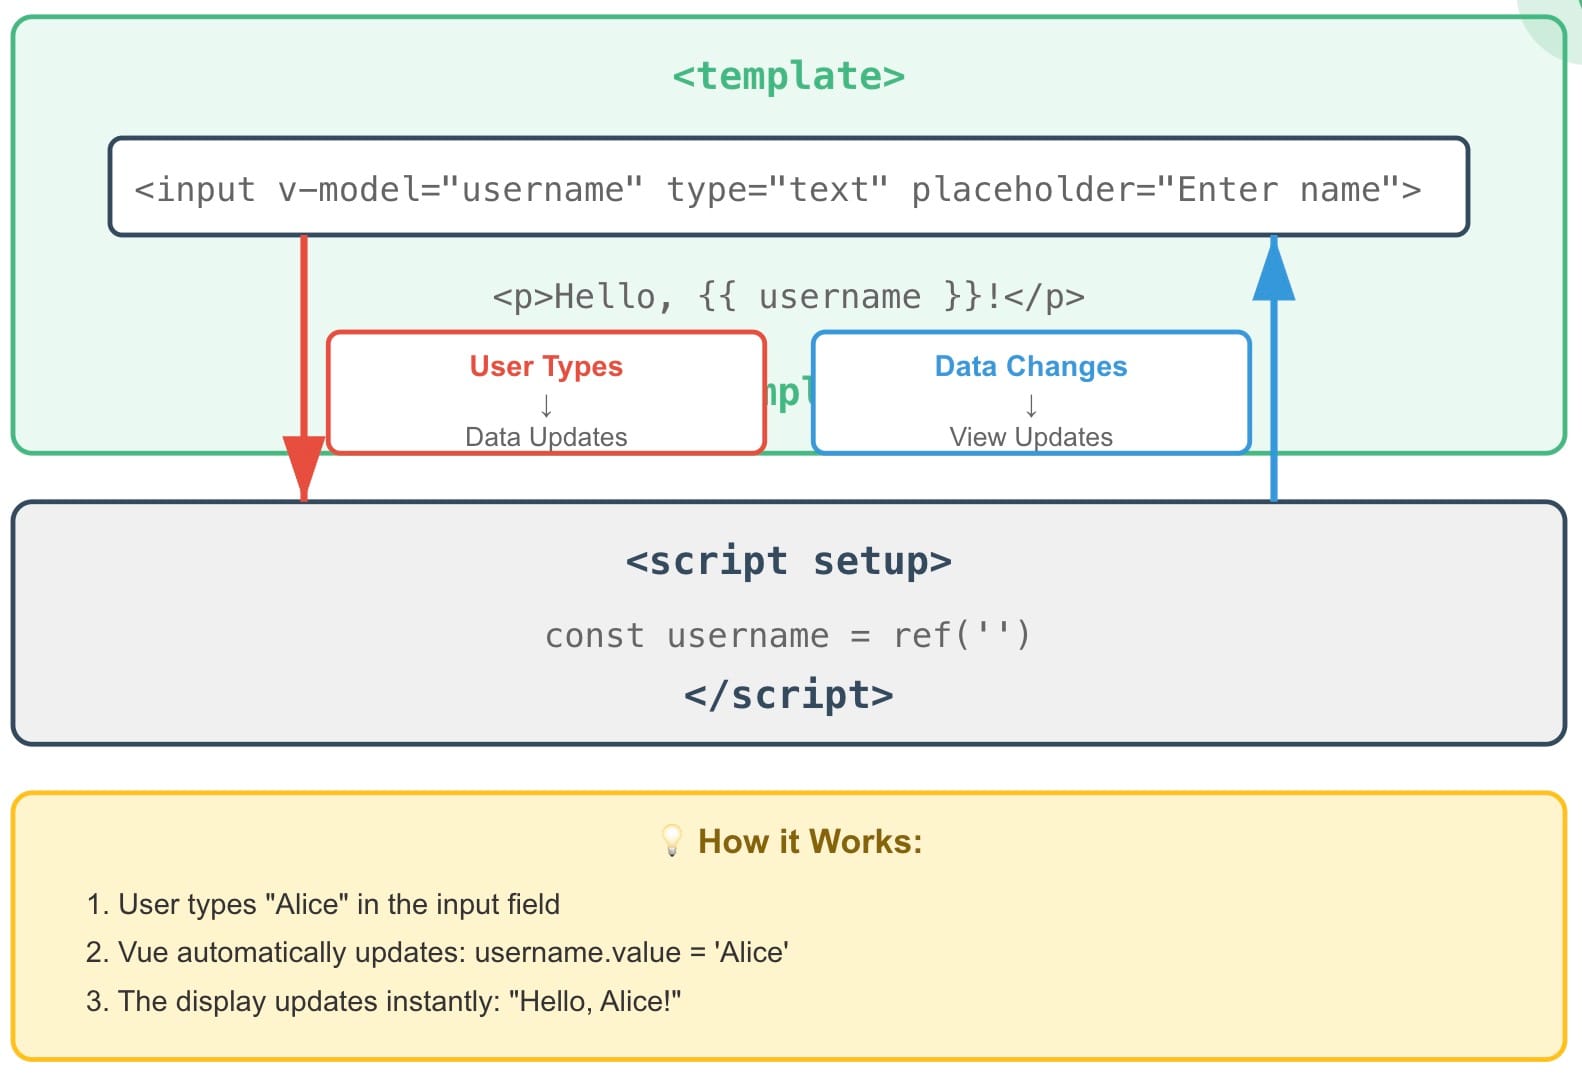
3. v-model: Two-Way Data Binding
The v-model directive creates a two-way binding between form inputs and your component data. When the input changes, the data updates, and vice versa.
<template>
  <div>
    <!-- Text input -->
    <input v-model="username" type="text" placeholder="Enter username">
    <p>Username: {{ username }}</p>

    <!-- Textarea -->
    <textarea v-model="message" placeholder="Enter message"></textarea>
    <p>Message: {{ message }}</p>

    <!-- Checkbox -->
    <input v-model="agreed" type="checkbox" id="agree">
    <label for="agree">I agree</label>
    <p>Agreed: {{ agreed }}</p>

    <!-- Radio buttons -->
    <input v-model="selectedOption" type="radio" value="A" id="optionA">
    <label for="optionA">Option A</label>
    <input v-model="selectedOption" type="radio" value="B" id="optionB">
    <label for="optionB">Option B</label>
    <p>Selected: {{ selectedOption }}</p>

    <!-- Select dropdown -->
    <select v-model="selectedCity">
      <option disabled value="">Choose a city</option>
      <option value="paris">Paris</option>
      <option value="london">London</option>
      <option value="berlin">Berlin</option>
    </select>
    <p>City: {{ selectedCity }}</p>
  </div>
</template>

<script setup>
import { ref } from 'vue'

const username = ref('')
const message = ref('')
const agreed = ref(false)
const selectedOption = ref('')
const selectedCity = ref('')
</script>
Works With:
- Text inputs and textareas
- Checkboxes (boolean or arrays)
- Radio buttons
- Select dropdowns
- Custom components (with proper implementation)
4. v-if / v-else-if / v-else: Conditional Rendering
These directives control whether elements are rendered in the DOM based on conditions. Elements are completely added or removed from the DOM tree.
<template>
  <div>
    <button @click="score += 10">Increase Score</button>
    <button @click="score -= 10">Decrease Score</button>
    <p>Score: {{ score }}</p>

    <!-- Simple v-if -->
    <p v-if="score > 50">Great job! Score is high!</p>

    <!-- v-if with v-else -->
    <p v-if="isLoggedIn">Welcome back, user!</p>
    <p v-else>Please log in</p>

    <!-- v-if, v-else-if, v-else chain -->
    <div v-if="score >= 90" class="excellent">
      Excellent! 🌟
    </div>
    <div v-else-if="score >= 70" class="good">
      Good work! 👍
    </div>
    <div v-else-if="score >= 50" class="average">
      Average 😐
    </div>
    <div v-else class="poor">
      Keep trying! 💪
    </div>
  </div>
</template>

<script setup>
import { ref } from 'vue'

const score = ref(60)
const isLoggedIn = ref(true)
</script>
v-if vs v-show: When to Use What?
v-if: Completely removes or adds elements from the DOM
- Use when the condition rarely changes
- Higher toggle cost but better initial render performance
- Supports v-else-if and v-else
v-show: Toggles the CSS display property
- Use for frequent toggling
- Element always stays in the DOM
- Lower toggle cost but always rendered initially
<template>
  <!-- Use v-show for frequent toggles -->
  <p v-show="isVisible">Toggle me frequently</p>

  <!-- Use v-if when condition rarely changes -->
  <p v-if="hasPermission">Rarely changes</p>
</template>
5. v-for: List Rendering
The v-for directive renders lists by iterating over arrays, objects, or ranges. It's one of the most powerful directives for dynamic content.
<template>
  <div>
    <!-- Array of strings -->
    <h3>Simple List</h3>
    <ul>
      <li v-for="(fruit, index) in fruits" :key="index">
        {{ index + 1 }}. {{ fruit }}
      </li>
    </ul>

    <!-- Array of objects -->
    <h3>Users</h3>
    <div v-for="user in users" :key="user.id">
      <h4>{{ user.name }}</h4>
      <p>Age: {{ user.age }}</p>
    </div>

    <!-- Iterating over object properties -->
    <h3>User Info</h3>
    <ul>
      <li v-for="(value, key) in userInfo" :key="key">
        {{ key }}: {{ value }}
      </li>
    </ul>

    <!-- Range (numbers) -->
    <h3>Numbers 1-5</h3>
    <span v-for="n in 5" :key="n">{{ n }} </span>

    <!-- Nested v-for -->
    <h3>Categories</h3>
    <div v-for="category in categories" :key="category.id">
      <h4>{{ category.name }}</h4>
      <ul>
        <li v-for="item in category.items" :key="item">{{ item }}</li>
      </ul>
    </div>
  </div>
</template>

<script setup>
import { ref } from 'vue'

const fruits = ref(['Apple', 'Banana', 'Orange'])

const users = ref([
  { id: 1, name: 'Alice', age: 25 },
  { id: 2, name: 'Bob', age: 30 },
  { id: 3, name: 'Charlie', age: 28 }
])

const userInfo = ref({
  name: 'Alice',
  email: 'alice@example.com',
  role: 'Developer'
})

const categories = ref([
  { id: 1, name: 'Fruits', items: ['Apple', 'Banana'] },
  { id: 2, name: 'Vegetables', items: ['Carrot', 'Broccoli'] }
])
</script>
Always use the
:key attribute with v-for. The key helps Vue identify which items have changed, been added, or removed, ensuring efficient DOM updates and preventing rendering bugs6. Putting It All Together: Real-World Example
Let's combine everything we've learned into a practical todo list application that demonstrates how these directives work together.
<template>
  <div>
    <h2>Todo List</h2>

    <!-- v-model for input -->
    <input
      v-model="newTodo"
      @keyup.enter="addTodo"
      placeholder="Add a todo"
      :disabled="todos.length >= 10"
    >
    <button @click="addTodo">Add</button>

    <!-- v-if for empty state -->
    <p v-if="todos.length === 0">No todos yet. Add one!</p>

    <!-- v-for for list, v-bind for classes -->
    <ul v-else>
      <li
        v-for="todo in todos"
        :key="todo.id"
        :class="{ completed: todo.done }"
      >
        <!-- v-model for checkbox -->
        <input v-model="todo.done" type="checkbox">

        <!-- Interpolation for text -->
        <span>{{ todo.text }}</span>

        <!-- v-if for conditional button -->
        <button v-if="!todo.done" @click="removeTodo(todo.id)">Delete</button>
      </li>
    </ul>

    <!-- Computed display -->
    <p v-if="todos.length > 0">
      Completed: {{ completedCount }} / {{ todos.length }}
    </p>
  </div>
</template>

<script setup>
import { ref, computed } from 'vue'

const newTodo = ref('')
const todos = ref([])
let nextId = 1

const addTodo = () => {
  if (newTodo.value.trim()) {
    todos.value.push({
      id: nextId++,
      text: newTodo.value,
      done: false
    })
    newTodo.value = ''
  }
}

const removeTodo = (id) => {
  todos.value = todos.value.filter(todo => todo.id !== id)
}

const completedCount = computed(() => {
  return todos.value.filter(todo => todo.done).length
})
</script>

<style scoped>
.completed span {
  text-decoration: line-through;
  color: gray;
}
</style>
Quick Reference Table
| Syntax | Purpose | Example |
|---|---|---|
{{ }} |
Display data (interpolation) | {{ message }} |
v-bind or : |
Bind attributes | :src="url" |
v-model |
Two-way data binding | v-model="name" |
v-if |
Conditional rendering | v-if="show" |
v-else-if |
Else-if condition | v-else-if="count > 5" |
v-else |
Else condition | v-else |
v-for |
List rendering | v-for="item in items" |
v-show |
Toggle visibility (CSS) | v-show="visible" |
Conclusion
You now have a solid understanding of Vue 3's core template syntax. These directives are the building blocks of every Vue application. The best way to master them is through practice—start building small components and gradually increase complexity.
Remember: Vue's reactivity system handles all the heavy lifting, so you can focus on building great user experiences!

🔍. Similar posts
What is Hoisting in JavaScript
08 Feb 2026
What is ECMAScript
08 Feb 2026
JavaScript Variable : var, let, and const
08 Feb 2026